
Hello Guys! This year my Fiance Mitch decided he needed a new costume. I mean, he has been cosplay the Mad Hatter for quite a while now. And after many months of discussion and research, he decided to go for the New Pennywise the clown from the upcoming It remake. BTW, this movie looks INSANE!!!!!!
When we started to make research for the costume, we realized that basically there was ONE picture available online. I mean, we spent hours looking and looking and really, there is only ONE, DARK, FRONTAL image. Luckily, it’s a full frontal picture which is pretty amazing to get the main details of the costume.
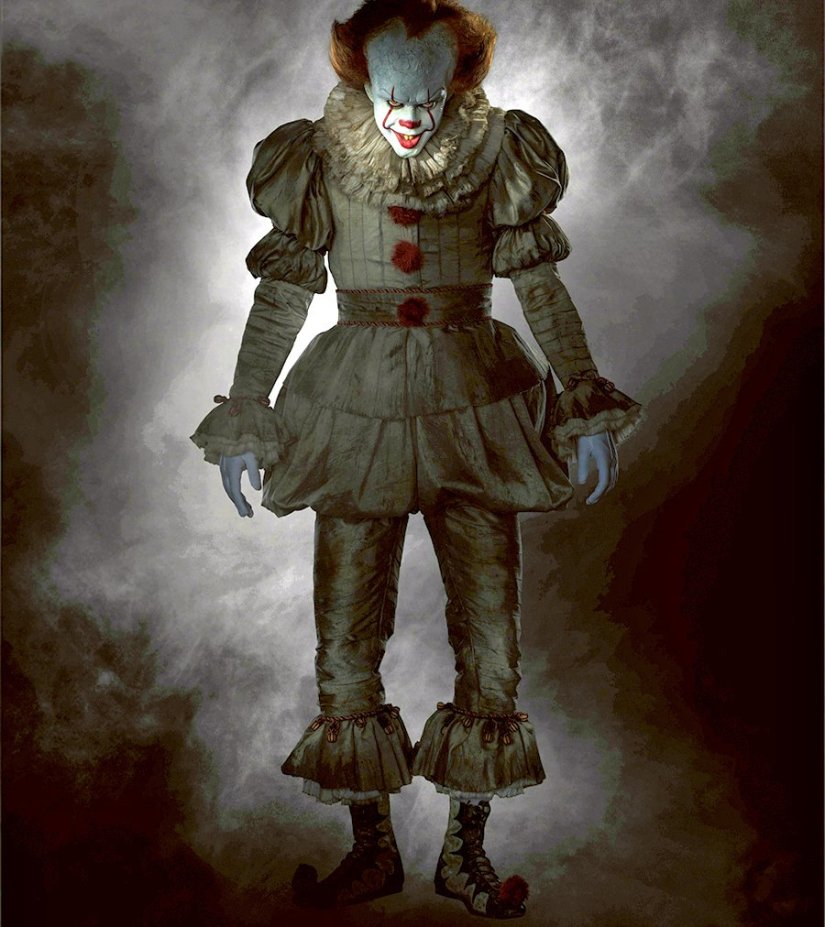
Through some lightning correction, I was able to get more details about the costume. I realized there were SO MANY PLEATS on his sleeves and pants!!!!
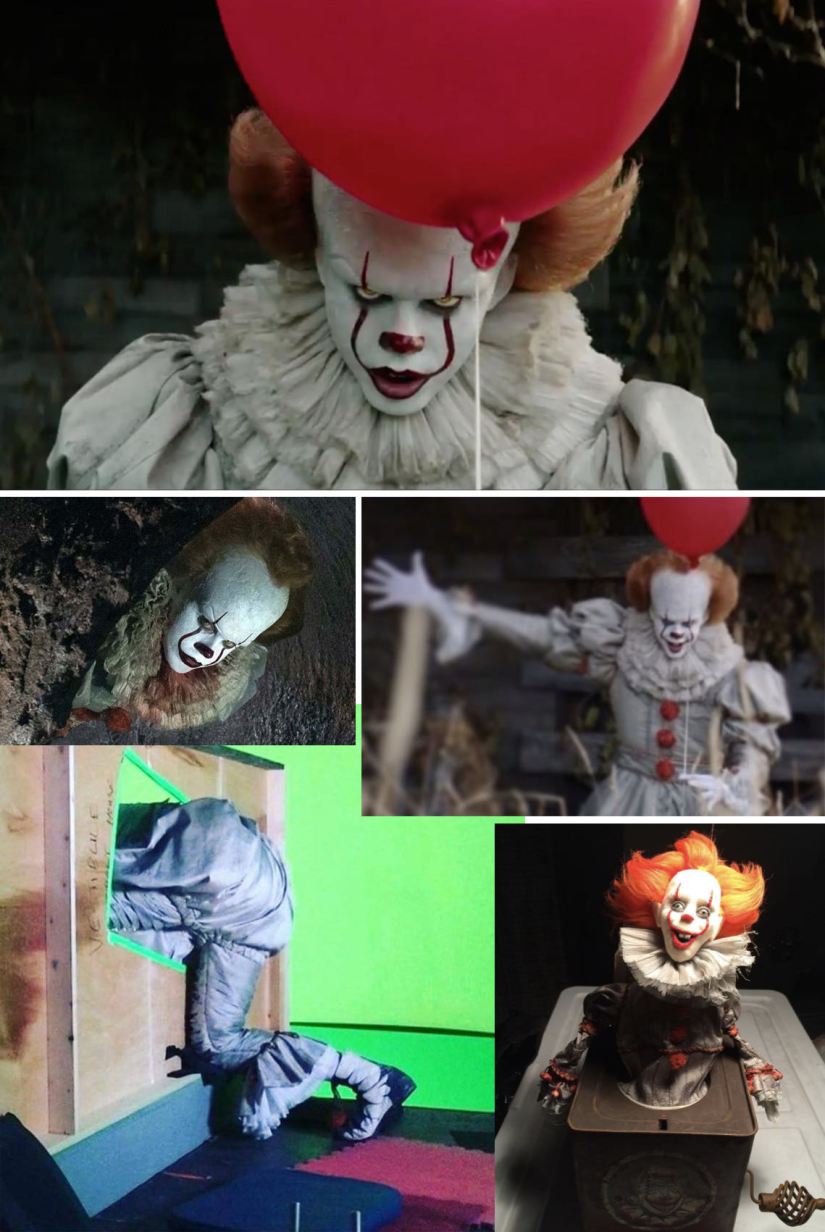
After plenty of hours I found this amazing blog that follows up the making of the movie! And thankfully, they had a few helpful pictures including one that showed the shoes!
I also found this post where the movie’s Costume designer Janie Bryant discusses her design for the new Pennywise costume. So the breakdown of the components are:
- Ruffled, puffy Collar with three different length of ruffles.
- High waisted jacket (doublet) with double puffed sleeves, long pleated sleeves with attached ruffles in the cuffs and attached peplum at the waist.
- Waistband.
- Pompoms (Dublet, waistband and shoes).
- Bloomers with attached pleated legs and ruffles at the hemline level.
- Boots (like boxers shoes type).
- Orange Hair.
- Clown makeup.
- White gloves
- Balloons (optional 😜).
Although on the interview the designer stated that the pompoms were orange, I had to make decisions: I actually had a hard time to find ORANGE wool in the middle of June, and time was so precious working on two costumes, while also working part time somewhere else I had to find a solution. So I had left overs of all kinds of red wool so I used that instead, besides, it matched the shoes, the trim and the make up.
To recreate the look of silk, I chose a polyester taffeta looking fabric in the upholstery section of a fabric store. One advantage about buying fabrics for upholstery is that they are usually 3m wide compare to the regular 1.5m of fashion fabrics. So that means you have to buy a little less fabric and the price are quite similar to fashion fabrics if you know where to look, this one was on sale. The only problem is that this fabric is pretty much unbreathable. But I’ll talk about that later.
The pattern making was fairly simple, the tricky part was to get the right proportions and to prepare the fabric with the pleats before cutting the bodice, sleeves and legs.

THE RUFFLED COLLAR
I bought a white cotton gauze fabric. Then, I measured the distance between the neck and the shoulder of my fiancé and that gave me the longest measurement of the ruffles. So if you are trying to recreate this collar, do it accordingly to your measurements.
This distance I split it in three and I got the following measurements: 12, 15, 18 cm.
When I built the collar, I thought that one width of the fabric was enough but when putting it all together it was really flat. This meant that I had to undo everything and doubled the quantity for every layer. Here you can see a comparison between collars:

So for the width, I use the entire width of the fabric (125 cm) twice per row (250 cm) and then gathered it on my sewing machine. Each layer was done there (3) times plus two more times of soft tulle.
For the base of the collar I measured around the neck and sew three straps of twill tape at about 8cm height.
When sewing the pieces I did one layer upwards and the other one downwards, similar to how ballerina tutus are sewn. this gives even more volume to the piece.

Once I was happy with the volume it was time to give some age to the fabric. For that I used a mix of black teas I had at home, very randomly with a pinch of black dye, a very small pinch.

I boiled water and mixed the three teas together for about 10 minutes in order to concentrate the color as much as possible. Separately, I boiled water and added a pinch of the black dye and salt. Then I mixed both mixes in a bucket and dipped the collar for about 2 minutes.

It gives a dirty old look to the collar and removes how new and pretty it was. And that was the purpose. Then I did the same for the ruffles in the cuffs of the pants and jacket.
On my next post I will show you how I built the shoes and the wig!
Until next time!


are you going to post the part 2 soon? ;)))
Yes, i am trying to post every week 😁❤️
This is so helpful, really looking forward to part 2! 🙂
Please post part II! We are all so excited
Do you sell the sewing pattern please? I would like to sew the PENNYWISE CLOWN COSPLAY Costume for my nephew. Please let me know
Hi Eva, unfortunately I don’t, the patterns I made were custom made so they are particularly done for him. Regards
You are doing an awesome job with this! I can’t wait to see part 2 and ultimately, the finished product.
I’m wondering, did you use a jig to measure your pleats? Also did you sew them so the seams show like on the movie costume? Regards.
Hi, i did my pleats by hand, no jig. The old fashion way 😜 measuring, ironing and measuring the next.
I don’t really understand your second question… regards
I just saw your post! Sorry for my delay, the pleats where just measured with a ruler and individually pressed… I passed a stitch 3mm from the edge of the pleat to keep them in place, otherwise they were opening like an accordion and I didn’t like that. Regards