Hello everyone! It’s been a long time since my last post. I Just been busy at work and trying to figure out some personal projects I will soon share with all of you.
So, today, I want to share a little project I did last week. I had a costume party and the theme was Cowboys & Indians… So my boyfriend and I came out with the idea of being Woody and Jessie from Toy Story (That’s enough Cowboy no? haha). We bought the costumes, since we didn’t have much time to make them, but the big deal for me was Jessie’s wig. I have seen she was this red wool hair and I wanted that look for my costume and also, my hair is too short to even make a normal braid… so why not make a wig?
This tutorial is great for any wool wig: it’s good for a Rag Doll wig, Jessie Wig or Sally wig… I fact any character you want to make for you or your child. i saw these really cute Tangled and Jasmin wool wigs while I was trying to figure out how these wigs were done.
So, the materials you need are the following:
* 1 or 2 skeins of 7 Oz. of wool (it’s like 5.5 mm of thickness) I used two different hues of Red. this is why i used two skeins but not fully.
* Stretch fabric for the cap (like the one you use to make sportswear). i would say you need about 15’X25′ inches for an adult wig.
* Elastic of 5/8 inches width (it can be 1/2 inch)
* Curved needle
* Thread

First you need to make the wig cap: For this step, you need a sewing machine. If you do not have one, you can buy a wig cap at a wig store. i decided to make mine so I could hide my hair completely with the red fabric in case the wool yarn was not covering all my hair.
So, Take the measurements around your head and from the middle front to the back of your head. Then, you need to cut 1 strap of 3.5 inches X 14.5 inches plus seam allowance. After that, cut two pieces of the side panels. Check the image below for reference. These measurements are for an adult wig of around 22 inches diameter. You can adjust the measurements by reducing the width of the center strap.
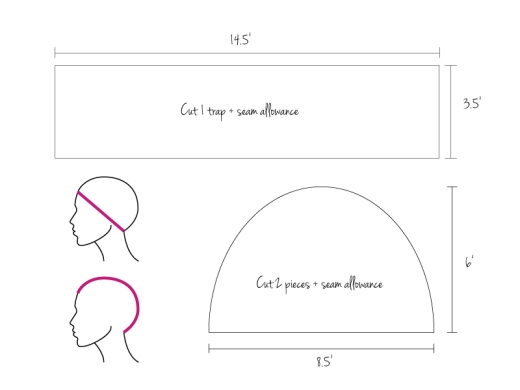
Put the three pieces together by using a zig-zag stitch. Once this step is finished, cut a piece of the elastic of about 20 or 19 inches long. This way the cap will be tight on your head and it won’t fall off your head. the result should look like this:

Next we are going to cut the yarn. First you have to measure the length of the wig you want to make. You can put your measuring tape on the top of your head at the length you wish to have from one side to another. Mine was 60 inches in total, which means there was around 30 inches on each side of my head.
To cut the strands of yarn you can attached it to a post or something and just wrap it around at the wishing length. I wrapped around 3/4 of each skein and then kind of mix them together. My wig was not parted at the center but on one side, but this next step applies for both styles. After having your strands at the right length, grab them from the center and pin the yarn to the wig cap. I used a Styrofoam head to put my cap and then pin the yarns.


After I place the strands of yarn where I wanted them, I start sewing them with a curved needle using a backstitch hand stitch. If you want to better secure the wool you can pass a straight stitch on your sewing machine, if you have one. Once this step is done you can cut the ends of the strands to make them individual and fix the length.
After that you can try different styles. i tried it loose for like a Sally Costume and I also tried two side braids and one side braid just to see which one I liked better.


The cool thing about this project is that you can make many character wigs by changing the color or length. for example if you make it with yellow, you can have a Rapunzel or Tangled wig. With black wool you have a Jasmine Wig or if you just make two red ponytails you have a Rag doll Wig!!!
And here is the final look! Hope you enjoyed it like i did. It was really fun, not too long to make and very easy to do. If you have any questions or comments put them at the bottom! ’till next time!


Wow! That is an awesome wig. Great job!
Fabulous tutorial!! Using it to make an Anna wig for my two year old.Thanks!
I’m happy you liked it! I would love to see the final results!! 😄
Hola Erika! no se si hables español, pero me gusto mucho el tutorial que hicistes sobre esta peluca de lana. Solo tengo una pregunta: ¿hicistes una sola pieza con la lana y lo cosistes sobre la gorra o hicistes varios grupos de “cabello”? Gracias! muy creativa chica. Este año quiero disfrazarme de Jessie porque mi hijo de 3 años se va a disfrazar de Buzz Lightyear y me parecio genial esta idea y mas barata que comprar una peluca roja.
Hola Monica! Me alegra que te haya gustado el tutorial. Empece con un solo grupo (mas o menos como 50 tiras) y las fui distribuyendo en la cabeza buscando que la cubriera desde la frente hasta la parte de atras. Tener una cabeza de styrofoam ayuda muhisimo porque puedes poner alfileres y verificar si tienes suficiente “cabello”. Como vi que no era suficiente, agregue otros dos sets y cuando logre el look que queria pase una sola costura en la maquina de coser. Mi recomendacion es que trates de poner la hebras de lana una al lado de la otra y no montadas para tratar de cubrir toda la cabeza y no tener demasiado volumen pues se dificulta luego hacer la trenza. Espero haya contestado tus dudas. Si tienes mas preguntas me avisas… Ademas quisiera ver tu resultado final!!! Van a verse hermosos!!! 😄
Great wig! This is a total long shot but I wondered if you had a shot of the back of the wig? I would love to see how this bit was sewn. Thanks for sharing
Hi Gayle ! Thank you for your comment. I went through my photos but unfortunately I didn’t have any photos of the back..it’s been a while since I made it but as far as I remember, It looked exactly like the front. It was a single line of strings all the way to the nape … hope that helps!
Hey! Thanks for the tutorial. Was your outfit homemade as well? Or did you buy the one they sell at costume stores?
Thanks!
Hi Courtenay, the costume was purchased, it’s the licensed one that is sold in lots of Halloween Costume Stores..It a good one time use costume but it’s comfortable. This was a last minute party so we ended up just buying the costumes and me doing the wig just to make it more fun!
Amazing work! What would you recommend for Wilma Flintstone?
Hi Melisa, do you mean what kind of yarn?